Binary Exploitation 101 - ROP
This blog series is still a work in progress. The content may change without notice.
In this chapter, we’ll learn about NX (No eXecute) bit and its bypass technique, ROP (Return-Oriented Programming). The materials for this chapter can be found in the chapter_05 folder.
Introduction
In the previous chapter, we put shellcode on the stack and jumped to it to spawn a shell. Now let’s think about this from the defender’s point of view: how can we prevent such an attack?
The reason the attacker was able to execute shellcode on the stack is that the stack was executable. However, as we saw in the Hello World chapter, the stack is intended to store data such as a function’s local variables and return addresses. Why should an area meant for data be executable? By making the stack non-executable, code placed on it can no longer run. That’s the idea behind NX bit.
NX bit
NX (No eXecute) bit is a security mechanism that makes the stack non-executable. In the previous chapter we disabled this by passing the -z execstack option at compile time. Looking at chal.c in this chapter, the code itself hasn’t changed, but we can see that option is gone:

When NX is enabled, the PT_GNU_STACK segment loses its execute (X) permission. We can check this by running the following command (try comparing the output with the previous chapter’s results):
1
readelf -l ./chal_patched
If the PT_GNU_STACK segment is marked non-executable, the kernel maps the stack as non-executable in the load_elf_binary function:
1
2
3
4
5
6
7
8
9
10
11
12
13
14
static int load_elf_binary(struct linux_binprm *bprm)
{
    ...
		case PT_GNU_STACK:
			if (elf_ppnt->p_flags & PF_X)
				executable_stack = EXSTACK_ENABLE_X;
			else
				executable_stack = EXSTACK_DISABLE_X;
			break;
    ...
	retval = setup_arg_pages(bprm, randomize_stack_top(STACK_TOP),
				 executable_stack);
    ...
}
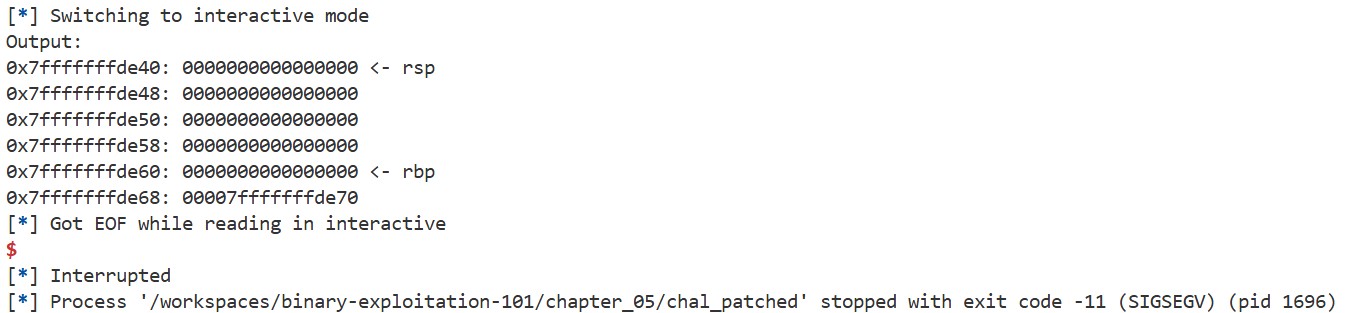
With NX enabled, we can no longer use shellcode on the stack. In fact, running the exploit from the last chapter causes the program to terminate with a SIGSEGV:
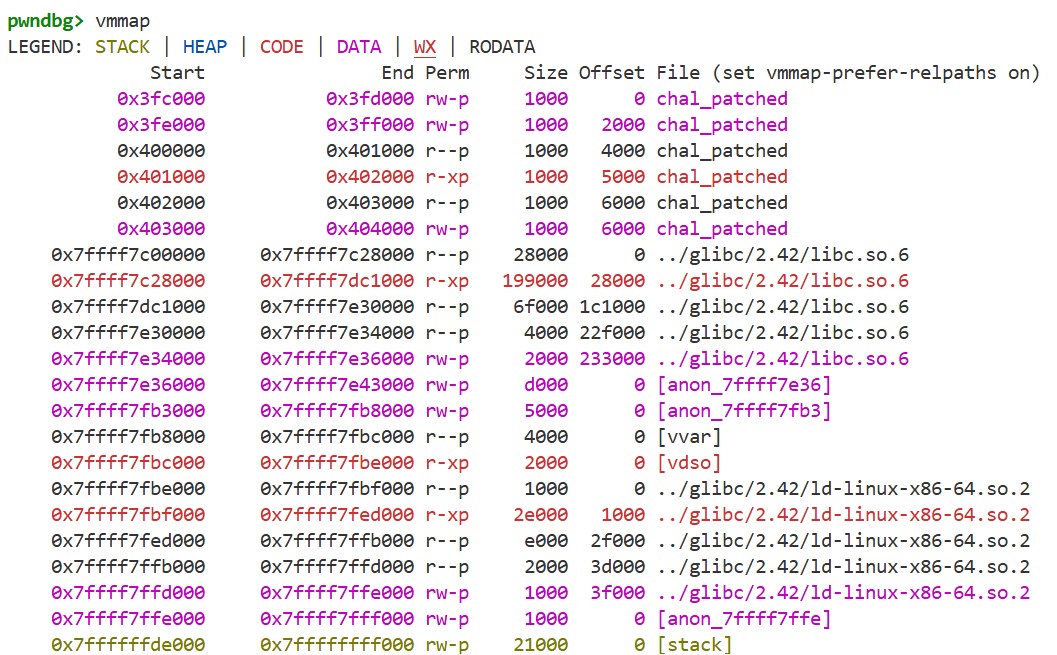
Let’s check with GDB that the stack is non-executable. First, start GDB with the following command:
1
pwndbg -q --ex 'b main' --ex 'r' ./chal_patched
Then, use vmmap to check the process’s memory map. We can see that the stack region is non-executable due to NX bit:
Now, let’s think from the attacker’s perspective. How can we bypass this?
ROP
Although NX bit prevents us from jumping to code on the stack, a closer look at the memory map we saw in the NX bit section reveals that there are still some executable regions. Using a buffer overflow, it is possible to jump to these regions. So, can we “cleverly” use the code in these regions to spawn a shell? This is the basic idea behind ROP.
First, let’s learn how to launch a shell. One option is to use the execve function explained in the previous chapter, but here we will use a simpler method with the system function.
The system function executes the string it receives as a shell command, so by simply passing “/bin/sh” as the argument, we can launch a shell. If we run the following program, we can see the shell:
1
2
3
int main(void) {
    system("/bin/sh");
}
The system function is a glibc function. As we saw earlier, glibc is mapped into the process’s memory space. This is because chal_patched is dynamically linked. In other words, the code for the system function is also mapped somewhere in memory. Let’s check this with GDB. Start GDB with the following command:
1
pwndbg -q --ex 'b main' --ex 'r' ./chal_patched
By using p system, we can display the address of the system function, and with vmmap we can check the memory map for the region containing that address. As shown below, the code for the system function resides in an executable region:

Using a buffer overflow, we can jump to and execute the system function, but the argument is incorrect:

The remaining problem is how to set the argument. As we saw earlier, to launch a shell using the system function, we need to put the address of “/bin/sh” into the rdi register. Is it possible to set a value in the rdi register while also transferring control to the system function?
Here, the key point is how the ret instruction works. The ret instruction pops the return address from the stack and transfers control to that address. However, this behavior relies on the assumption that a function is called via a call instruction, which pushes the return address onto the stack. In a “normal” program, this assumption holds true, but with a buffer overflow, we can control the values on the stack and thus break this assumption. In fact, as we saw earlier, by overwriting the return address of the main function, we redirected control to the system function. In this case, system is invoked via a ret instruction rather than a call instruction.
Even in this case, the system function executes the ret instruction according to the (incorrect) assumption that the function was called via a call instruction (in reality, the value in the rdi register is an invalid address, so the program will terminate with a SEGFAULT before reaching it). Because we can control the values on the stack, we can also freely control the address that is popped by this ret instruction. By repeating this process, we can use code fragments that end with a ret instruction, called ROP gadgets, to execute arbitrary operations. This technique is known as ROP (Return-Oriented Programming).
As an example, let’s run the following code. 0x401204 is the address of the main function, and 0x401270 is the address of a ret instruction. You can find these addresses using the readelf or objdump commands:
1
2
3
4
5
6
7
8
9
10
11
def main():
    addr_main = 0x401204
    addr_ret = 0x401270

    payload = b'\0' * 0x20
    payload += p64(0)
    payload += p64(addr_ret)
    payload += p64(addr_main)

    conn.sendlineafter(b'Input: ', payload)
    conn.interactive()
We can run this program using the gdb.debug function in pwntools. By stopping at the ret instruction of the main function and running x/2xg $rsp, we can see that the stack just before the ret instruction looks like this:
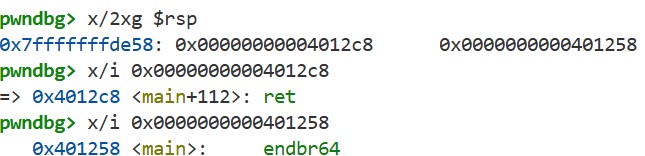
If we execute si twice here, we can see that control is transferred to the main function (0x401204).
The ret instruction in the main function transfers control to the ret instruction (0x401270), which in turn transfers control back to the main function (0x401204). This demonstrates how we can use ROP gadgets to execute arbitrary operations.
Exercise
Based on what you have learned so far, write an exploit that launches a shell using ROP. Before you start, make sure to execute the following command (if you are using a Docker container, run it on the host) to disable ASLR:
1
sudo sysctl -w kernel.randomize_va_space=0
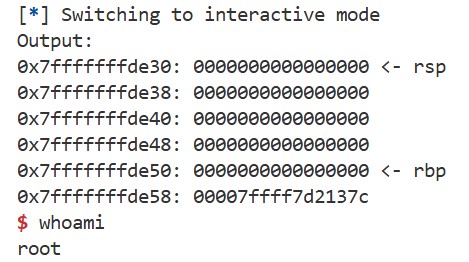
You can use the template, and the following hints may help. If successful, you should be able to launch a shell like this:
If you have any questions, feel free to leave a comment below. You can see my solution here.
Hints
- To find ROP gadgets, ropr is useful. For example, you can search for a ROP gadget like
pop rdi; ret;using the following command:1
ropr ../glibc/2.42/libc.so.6 -R "^pop rdi; ret;"
- Besides ropr, you can also use pwntools’ ROP tool.
- The string “/bin/sh” actually exists somewhere in libc. You can find it with the following command:
1
strings -t x ../glibc/2.42/libc.so.6 | grep /bin/sh
Even if you set the arguments correctly and call the
systemfunction, you might still encounter a SEGFAULT at the movaps instruction inside thedo_systemfunction, as shown below:

This happens because the movaps instruction expects the stack to be properly aligned. For more details, see the Intel SDM. To fix the alignment, you can insert an additional ret instruction.